Pages

Showing posts with label worm. Show all posts

Saturday, April 2, 2016

diy apartment aquaponics | WARNING Worm Farm is Out

diy apartment aquaponics


WARNING? Worm Farm is Out?
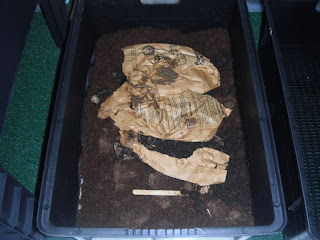
I have had my Worm farm on the balcony for just over a year, its been nice to take out the Veg leftovers and putting them in the bin and letting the red worms do their thing.
Although I dont actually have enough space to put the newly generated soil, it just seamed like a key part of my mini balcony eco farm system.
But now I cant wait to get rid of it..... and others take WARNING....
I have had an on going health issue for about 3 months, now im a vegetarian and eat pretty healthy dont smoke and keep reasonably fit, I kept getting a really bad cough followed by itch eyes and flu symptoms, it came way to often and started to get concerned so a trip to the Doctors for the usual anti viral meds, but nothing worked, this followed by weekly blood test, of which all were clear.
After some detective work at home I realized I was getting sick on a Monday, so process of elimination i narrowed down to chores I did on a Monday, and taking them weekly scrapes out to the worm bin was an unlikely cause, but guess what, seams like its quiet common to get "Compost Lungs" a bacteria spore that causes my exact symptoms and is quiet common also with Mushroom growers.

So if you have been suffering a constant cough, it may be your compost bin, this can be cured by wearing a dust mask when you attend it but I have decided to take mine out of the equation, and get well again.

Some other people with same symptoms from a worm farm LINK
Check Wikipedia  for more details   " Compost Lungs" 


Do you find information about diy apartment aquaponics are you looking for? If not, below may help you find more information about the diy apartment aquaponics. Thank you for visiting, have a great day.
Read More..

Monday, March 28, 2016

diy budget aquaponics | Balcony Garden Update

diy budget aquaponics


Have got my Garden all prepped and ready for summer!
Started harvesting my first Asparagus, with one measuring a whopping 27"
organic fertilizer added, Mulch added.
Fist year for Raspberry bush x 2, Black currant, Gooseberry, Rhubarb, and my blueberries dont look like they have made threw the winter.
second year for Blackberry bushes x 2, and Asparagus x 2, Rosemary, Parsley
planted 3 Tomato bushes, 2 capsicum/ bell peppers, chili peppers, Basil, Coriander, spring Onions, Marigolds, cucumbers, and potatoes


Do you find information about diy budget aquaponics are you looking for? If not, below may help you find more information about the diy budget aquaponics. Thank you for visiting, have a great day.
Read More..

Sunday, March 20, 2016

diy aquaponics on a budget | Sprouts in a Can

diy aquaponics on a budget


So I wanted to to make use off some sardine cans and found them to be a great size and use for growing spouts.
I filled the container with cotton wool soaked with water, then added the seeds, I used Cress and Mustard sprouts.
Make sure you plant mustard seeds 4 days latter than cress to have them harvest at same time.
cover with a damp napkin and place in a sunny window ledge.
now if you repeat about every 4 days you will have a constant fresh spouting Cress and Mustard sprouts or what other sprouts you choose.
Also have a look at The-urban-survivalist for some great tips and Dan does a great daily video with good tips so go check him out at The Urbivalist
enjoy.
Items needed, 1 sardine can, Cotton wool, Napkin and seeds.

Sprouts after 4 days

Cover with moist napkin until sprouts have started sprouting

Sprinkle seeds on moist cotton wool in the can


Do you find information about diy aquaponics on a budget are you looking for? If not, below may help you find more information about the diy aquaponics on a budget. Thank you for visiting, have a great day.
Read More..

Sunday, March 13, 2016

diy aquaponics cheap | Worm Farm

diy aquaponics cheap


I went to a compost and worm farm community talk and class, anyway it was very informative and got to watch the worm farm put together.
at the end there was a raffle for 2 worm farms.
I am now the proud owner of 1 of them.
it was my intention to make one out of recycled stuff , but hey whose complaining.
The class given by Steve Batley of Sydney Organic Gardens


The new Worm farm tower
Far right! The base with legs, and tap, 1st tray, 2nd tray, and lid
2 composting bins, will only use one , as it fills up with worm castings will start using 2nd one, the worms make their own way up.

the first bin is filled with a peat coconut coir soaked in water till its expanded, not wet just damp, place cardboard at bottom of 1 tray to stop the dirt falling threw, spread the mix and add the worms , cover with damp news paper. the brown bag was just  temporary added at the class!

The first tray is placed in the bottom of the tower where the worm tea will collect and the tap for harvesting.

add the 2nd tray but will remain unused for time being.


Place the lid on
You dont feed the worms for the first week, just cover with damp paper, then slowly add the scraps of food under the paper, there is no smell, but if you add more than the worms can eat at one time this will rot and start to smell, or if it gets to wet! so dont over feed or make too wet!
also add some bits of card paper with the food to keep a good consistency.
DONT: feed meat, fish or dairy products, (egg shells are ok) or onion or garlic.

It will take about 3/4 months before 1st bin is full and can spread the castings in the garden or in my case on my planter boxes, the worm tea can also be diluted and used as a plant growing tonic.
It will also provide additional food to feed the fish and chooks they will love the worms!!

As my worm farm only came with a sample worm set up, i went to a local garden center and purchased 500 red worms.
FACT: did you know out of 100s of types of worms there are only 3 types that will compost food, the red worm being best?


Do you find information about diy aquaponics cheap are you looking for? If not, below may help you find more information about the diy aquaponics cheap. Thank you for visiting, have a great day.
Read More..

Saturday, March 5, 2016

diy aquaponics fish tank heater | Egg Shell Planter

diy aquaponics fish tank heater


I wanted to try a new experiment making planter for seedlings using egg shells.

First I saved my breakfast eggs and only cut off the very top of egg.
Once I had 12 I made 2 small holes in the bottom of each washed and dry egg shell.
then I filed each one with a good potting soil mix and placed back in a egg carton tray.

I added the seeds, In this case Coriander / Cilantro and lightly watered.
I placed the carton with eggshells in a tray and filled with water so it could self wick and keep moist.

Watch my video to see the process.

Search eBay for Coriander / Cilantro seeds

The Coriander / Cilantro in egg carton now ready to plant

Ready to be planted in my balcony garden

Crush the shell before planting

The egg shell seedling planted in garden


Do you find information about diy aquaponics fish tank heater are you looking for? If not, below may help you find more information about the diy aquaponics fish tank heater. Thank you for visiting, have a great day.
Read More..

Friday, February 19, 2016

diy aquaponics barrel | Worm Farm Update

diy aquaponics barrel


It seams that at last after a few months the worms have bread to an amount where I can add scraps daily and it all gets munched.
I also noticed they have got a lot fatter.
I started with 500 worms in a box which was about $50, I think you really need 1000 + worms to really get it going.
Have traded some of the soil out by putting a few scoops in the top basket with no food so they leave the soil for the lower basket with the munchies in, then I can add the soil to my pots to enrich the soils
The chook got a few treats of big fat worms too.


Do you find information about diy aquaponics barrel are you looking for? If not, below may help you find more information about the diy aquaponics barrel. Thank you for visiting, have a great day.
Read More..